We're On A Mission: Air Missions In ETO
- Alan Emrich
- Oct 8, 2019
- 11 min read

OR: Picking Your Air Missions and Targets
By Alan Emrich
The easy-to-manage yet robust air system in Frank Chadwick’s ETO is the product of decades of design evolution spanning many games, including the designer's Europa and Third World War game series. Per ETO’s design philosophy, we wanted to:
Keep things as simple and manageable as possible.
Keep things historically concrete in preference to abstract. And...
Provide meaningful player choices using attractive components that yield a great gameplay narrative.

Playtesters have consistently praised the fun and cleverness of the ETO air system, and they give us confidence that you will really enjoy it too.
But we should address this question: After Dogfighting and Close Air Support (which comprises most of the aerial activity on the Eastern Front), how do you use the other tools in your Air Missions toolbox? This article is a primer explaining what those underemployed Air Missions do and where to find opportunities to use them.
Keep Your Friends Close and Your Air Support Closer
Naturally, a ground war in Eurasia will feature a lot of Close Air Support Missions, and players master this Mission very quickly – adding Bombers or Fighter-Bombers (with or without Fighter Escorts) to a Ground Attack in hopes of garnering Close Support (CS) dice and their potential favorable combat odds column shifts. A vital player consideration is the Air unit’s Strike Strength (i.e., its lightning bolt symbol) as that is the only measure for this Mission.
During the inclement weather of Overcast, Snow, and Extreme Cold, not only is your free air recovery rate (for non-Hindered air forces), but you are also reaching for the Inclement Weather Close Support (CS) dice where the Armor and Red Bolt symbols have been replaced by another Airplane and another Blank symbol. So, anticipate fewer, less effective, and more costly (in terms of air attrition to the attacking Air units) operations flying in such inclement weather.

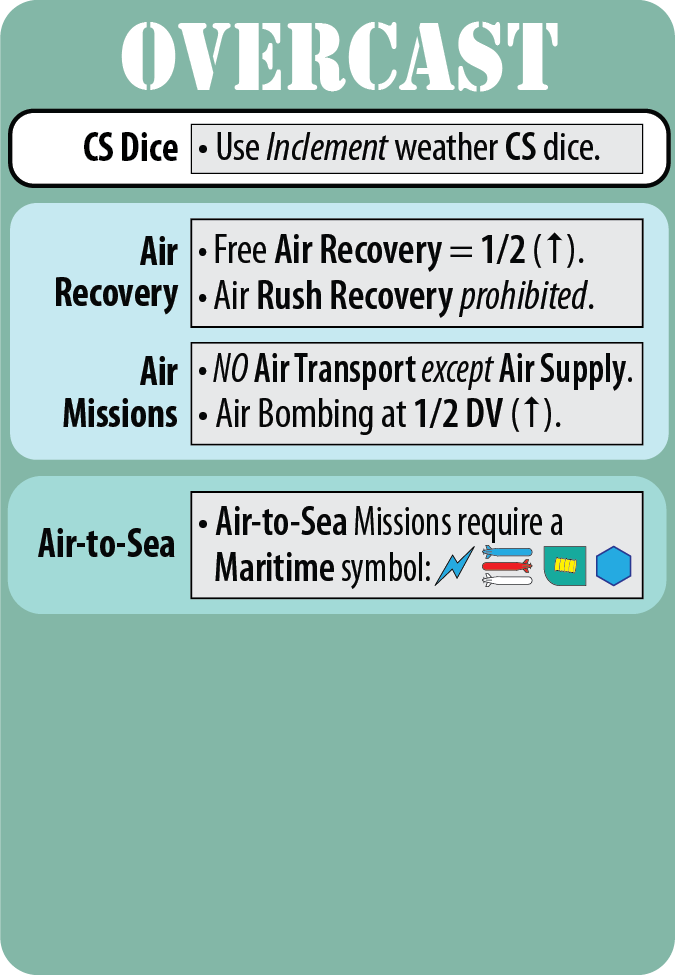

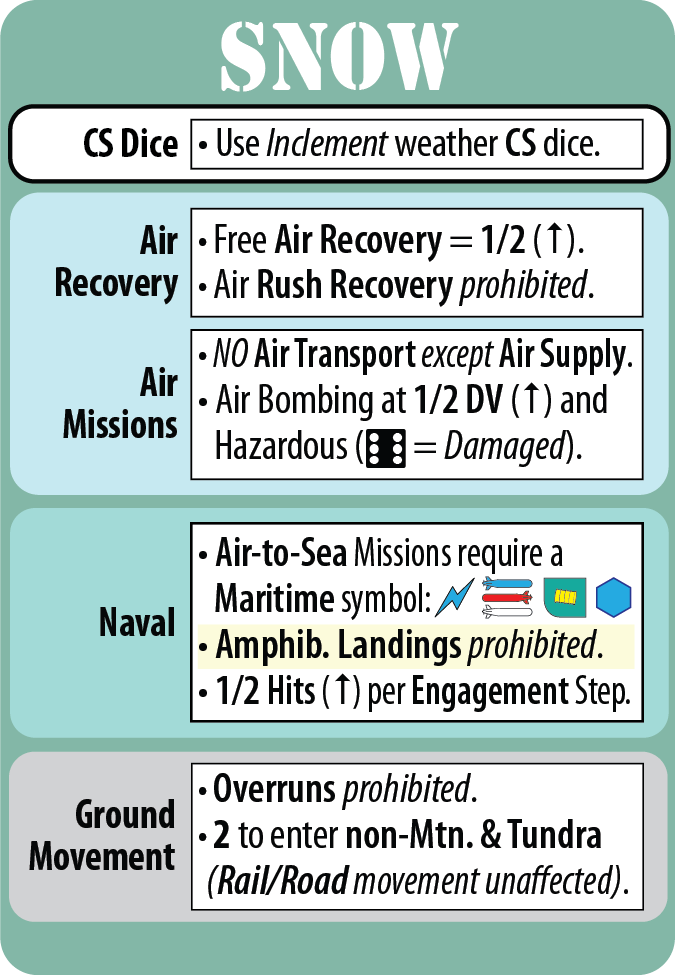

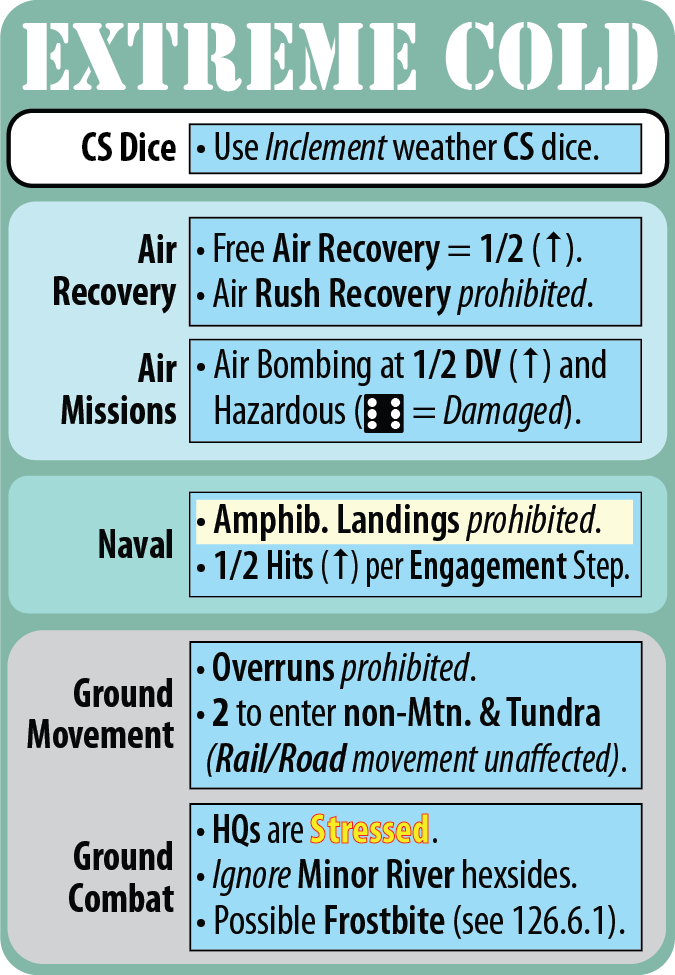

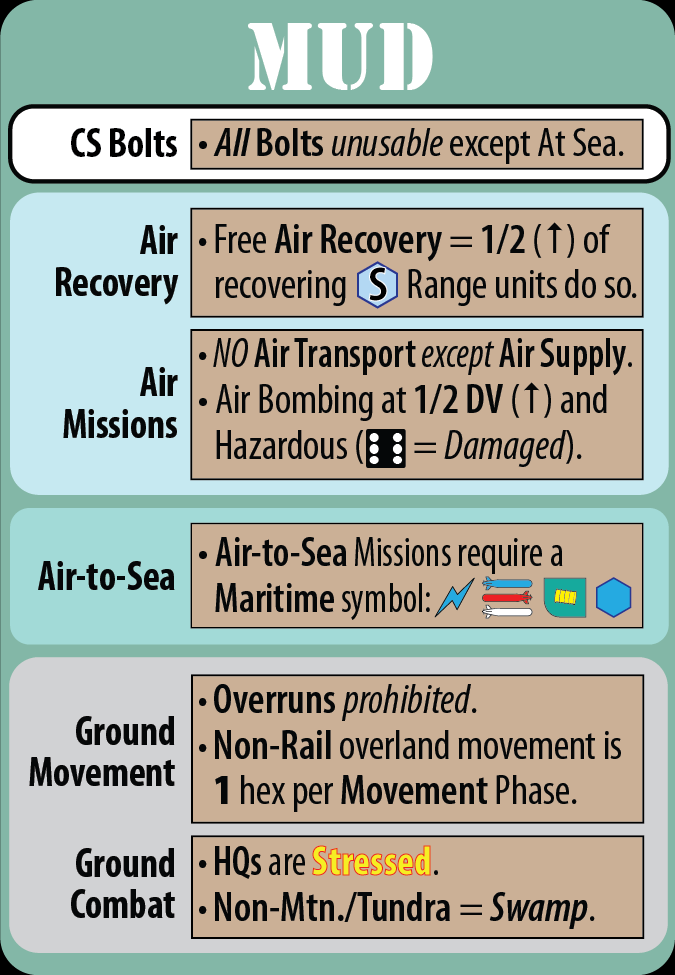
Mud is the enemy of all, snatching away all CS symbols from units, cards, etc. and leaving your options for support from the skies few indeed. Since most Medium Bomber units have both a Strike and a Bomb Strength, at least they can find other employment in unfriendly weather by employing their Bomb Strength and that, dear reader, is what this article is about.
The Evolution of Close Support

It took some design evolution and playtesting to get the Close Air Support Mission effects correct. Rather than a deterministic effect (as used in the progenitor games from the Frank Chadwick’s Campaigns in Russia series) or a random table result (which worked, but was clunky), we opted instead for rolling custom Close Support (CS) dice with each yielding a potential odds shift. These neatly covered the effects of the close air support itself (hit or miss) and provided half-shifts which pair up into full shifts.
That is, when a Heavy unit (i.e., one with the armor oval in its symbol), an undamaged Bomber unit providing close support (that presses on and suffers damage from anti-aircraft fire), or a Red bolt is participating (typically from a quality Air or Naval unit or when playing a superior commander’s card) and you roll their matching results, each provides a full odds shift…
Not Giving a Shift

If you roll those results without those features at that Battle, each instead generates only a half-shift (rounded down). Thus, players learn that they should put together Close Air Support Mission Packets that, combined, have at least two white (normal) Strike Strengths.
This is because, should their Ground Attack include neither a Heavy unit, red lightning bolts, nor an undamaged Bomber (which can happen from enemy Fighter Interception), going in can still yield two half-shift results which combine to generate one full combat support odds shift. Hey, something is better than nothing, and many gamers, snake bit by dice, fly pairs of White bolt CAS missions as prudent “bad luck insurance.”

Importantly, Red bolt Strike Strengths are not only helpful in converting their results on the Close Support dice to full shifts; they are also usable during the opponent’s turn to provide defensive close support! Even the threat of flying defensive close support will dampen your opponent's enthusiasm. Air units having red lightning bolts for their Strike Strength require thoughtful consideration and careful employment when planning their operations in the ETO series. Unfortunately, many of them are Vulnerable Air units until later in the war, which makes flying them hazardous to their health. Employing them both offensively (on your turn) and then turning them around and immediately using them defensively (on your opponent’s turn, assuming they returned undamaged) consumes Fuel Points (FPs) and that is a bill that can quickly become unaffordable (especially for the Axis).
Damage Values and Hits
When performing most other Offensive Missions, you will roll for Hits and Misses (needing at least one Hit to succeed). Simply multiply each Strike or Bomb Strength by that Mission’s target type (x3 for Soft; x2 for Average; and x1 for Hard) to arrive at its Damage Value (DV) – which is the “To Hit” number you must roll or less to succeed.
For missions rewarding multiple Hits, the successful die’s result is the number of Hits scored (e.g., if you have a Damage Value of 3 (i.e., DV = 3) and rolled a 1, you would score 1 Hit; a roll of 2 scores 2 Hits; 3 is 3 Hits; with 4, 5, and 6 being unsuccessful. Note that a roll of 6 is always unsuccessful no matter how high a Damage Value achieved – gravity bombing is an imperfect art so the target always “owns the 6.”
Saying “Oh, No You Don’t!” with Fighter Sweeps
Once upon a time in ETO, before the Axis invaded Russia, during their campaigns in the West the previous year, there was no Air Escort Mission and Intercept Missions were limited to one intercepting Fighter unit! Yes, when you play these campaigns in Volume II: Decision in the West, those early war years will see some pretty brutal Air unit attrition (until early into the Battle of Britain, when Goering saw about 8 or so Air units piled up in the Axis Destroyed box and instructed his Fighter pilots to start close-escorting their bombers to keep losses down; RAF Commander Mallory proposed larger air engagements -- at which point the rules you are familiar with kick in: 1 Escort vs. up to 2 Interceptors).

So how do you protect unescorted Bombers? Fighter Sweeps is the tool most used for that. It is how you bring Air-to-Air Dogfighting about and get your licks in versus enemy Interceptors.
The math we have all experienced playing Thunder in the East is pretty basic: when there are two Fighter units Dogfighting versus one Fighter unit escorting, it is going to be bad for that lone escort Fighter unit. When escorting a Packet of Bombers, only one Fighter unit can be assigned, and yet up to a full Packet of two Fighter units can Intercept! Should that lone escort Fighter unit survive and take its turn shooting back, then at least it can take its pick of either of the two enemy Fighter units that “bounced” it (and typically picks on the weaker of the two, therefore getting its best chance to inflict some damage on it).
And this is how the story goes until the gradual replacement of Medium Bombers and Ground Attack Air units with smaller Fighter-Bomber units that can keep the enemy from achieving a high differential on the Dogfight table.

Now, suppose you could turn the tables on those enemy interceptors harassing your Bombers? That is what a Fighter Sweep Mission is all about. On your turn, you can position your Fighter units on this mission up to half their Range from a friendly Air Base and, from there, they can react once, up to 3 hexes from that, their Patrol hex, to return fire against enemy interceptors. Should your Escort Fighter unit survive the enemy interception, your Sweep Fighter unit can join it and now you can combine two Fighter units’ strength against one enemy interceptor (take that!). By turning the tables thus you can create some noticeable attacker air attrition in the process.
Essentially, where you have a Fighter Sweep Mission established, it protects your nearby Bombing Missions from enemy interception by the very threat of their vengeful presence. They are there to discourage enemy thoughts of intercepting but, should your opponent risk sending their fighters up to intercept you, your fighter sweeps can deliver a healthy dose of wrath and punish them for doing so.
Saying “I Hate You” with Bomber Interdiction and Fighter Strafing

While more useful in theaters with fewer Ground units where each is individually crucial, you have the ability to single out an enemy Ground unit and pound it from the skies via Bomber Interdiction and Fighter Strafing Missions; your success at Interdiction deprives it of its ensuing Special Movement Step while both Interdiction and Strafing Missions halve its Attack Strength during its Combat Step. (In ETO, when a unit’s Attack Strengths is halved twice, it cannot attack at all; an out of supply unit can be a very tempting target for these Missions to completely quell their counterattack possibilities.)
Making life fairer, the Damage Value multiple varies by the size of the targeted Ground unit: x3 vs. Small; x2 vs. Medium; and x1 vs Large. Thus it is three times easier to clobber a stray Small Division unit than to affect an enemy Large Army unit.
When it is obvious that the enemy is counting on a key unit during their next turn, Interdiction and, if you have unemployed Fighters to spare, Strafing Missions are the tool you should reach for; success is chancy but it is often worth a stab against key enemy units.
Saying “Do Not Reply” with Airfields Attacks
After the Axis’ opening gambit of destroying the Soviet Air Force on the ground via their Blitzkrieg! card’s Sneak Attack, the air war’s priority on the Eastern Front switches from enemy Air Suppression to providing Air Support for embattled attacking ground forces (as it should). However, both sides retain the ability to strike at enemy Air units “on the ground” to achieve the nominal result of suppressing them (and thus requiring more repair time before they are again Available for active duty). It is improbable that Airfields Attacks will cause havoc sufficient to destroy enemy Air units, but tangling them up on the ground is an excellent result, making employing this air mission a very useful ploy. Better still, a tangled Air Force riddled with Suppression markers is a tempting place for your opponent to spend their Free Stuff (and Fuel Points) to help recover it promptly.

An Air unit’s Strike or Bomb Strength will work for Airfields Attacks; with a x2 vs. an Average target and each Hit scoring a Suppression marker. Thus, a little effort can create considerable chaos with a few lucky rolls. A 1-strength attack in clement weather does, on die roll results of 1-6: 1, 2, 0, 0, 0, and 0 Hits – for an average of 1/2 Suppression marker per Airfields Attack. The math improves for the attacker with a 2-strength attack in clement weather (often from a Packet of two Bomber units contributing 1 Strength each to the total) does 1, 2, 3, 4, 0, and 0 Hits – for an average of 1.67 Suppression markers per Airfields Attack. Imagine what even a small string of above average rolls can do… but, like buying a lottery ticket, you have to fly the Mission and take the chance before that can ever happen.
Mission DVs are lowered by one (-1) during inclement atmospheric conditions and are halved for night bombing by non-night capable Bombers. Worse, instead of a die roll of 6 merely missing, the hazards of such flying inflict a Hit on a Mission Air unit! What this means is that the tempo of Strike Missions is curtailed under inclement weather conditions and Bombing Missions become less effective and more hazardous for the Bombers. Like the Ground War, the Air War can also see lulls in activity during inclement weather.

The question remains: is mere suppression of enemy Air units worth it? Yes, because Suppression markers are “sticky.” That is, each turn, at most only half (rounded up) of recovering Air units remove their Suppression markers. In other words, if you inflict two or more suppressions, part of their effects will linger for more than one turn (and longer still if you can achieve many of them concurrently or a steady stream of them consistently) due to their half-life nature. Untangling Suppression markers from your Air units is a time-consuming matter, made doubly worse for Hindered Air Force inefficiencies (i.e., for Soviet, Italian, and Small nations) and when equal recovery problems inflict the Axis during inclement weather. Yes, there is an "out" via Free Stuff + FPs, but that is an expensive way to go!
When you want to make a concerted effort to inflict maximum suppressions (so they stick for a long period of time) – and playing your Air Offensive or the Axis' Blitzkrieg! card really helps with this – or when you cannot use Strike Strengths during severe weather (e.g., Mud) and want take a shot at annoying your opponent, Airfields Attack Missions are both useful and potentially quite effective.
Their Finest Die Rolls

I don’t know how many times developer Lance McMillan and I have simulated The Battle of Britain using the ETO air system. It is a very fast procedure for us, with the Luftwaffe trying to perform sufficient Airfields Attack (and a few Anchorage Attack) Missions to put the RAF sufficiently on its back to make a cross-channel landing viable (excluding the naval component of that equation, of course; our playtesting at that time focused on perfecting the Air System).
With slightly-more-favorable-than-average results (die rolls) and dedicated resource consumption by the Axis to keep the pressure on, it is possible for them to achieve air superiority over the English Channel in that situation – but the British can extract a high cost in Axis Fuel Points (the Axis’ Achilles heel) needed to repair destroyed Axis Air units. Thus, The Battle of Britain comes down to a test of wills; who quits first? The Axis to stop bleeding their precious fuel reserves, or must the British move the RAF into their Air Reserve to retreat from the wrath of enemy Airfields Attacks?
Saying “Eat This!” with Logistics Bombing
Logistics Bombing is a “level bombing” Mission, meaning only Bomb Strength applies (not Strike Strength). Your target is the enemy’s logistics (forcing them to place Out of Supply markers on their front line units) in addition to possible next-turn reductions in their Rail Capacity. Like an Interdict Mission, a Logistics Bombing Mission tries to nobble the opposing units’ ability to maneuver and attack during their next turn, but while the former takes a rifle shot at a specific enemy unit (the bee-by-bee approach), this latter Mission takes a shotgun blast at the queen.

Your Bomb Strength is x3 vs. the Soft target of a functioning enemy logistics center; each Hit scores 1 Out of Supply marker that the opponent assigns to all their supplied units in a hex within the target’s Supply Radius – and their first preference must be hexes with friendly units in EZOCs. Each Logistics Bombing attack scoring two or more Hits also chips away one enemy Rail Capacity for the following turn.
If there is a sector of the front where you face supplied enemy units you suspect plan you serious harm next turn, the effects of a Logistics Bombing Mission on their logistical windpipe could place enough Out of Supply markers among them to buy you a turn’s reprieve from an attack that large. This is particularly useful in support of your own planned breakthrough operations that turn to reduce the effectiveness of potential enemy counterattacks!
The Tricky Bits: Half-Range, Night Missions, and the Air Reserve
When you reach the Optional rules, air operations soar to new heights.
Half-Range, Double Bombload Missions provide just what the name says: double Bomb Strength (this does not affect Strike Strength) for either Large Air units (i.e., Heavy Bombers) or those with only a 1/2 Bomb Strength (doubling them to a full 1 Bomb Strength point). You are reminded that ehse units can "Half-Double" by their Bomb symbols being at a jaunty 45-degree angle on their counters. Other Air units cannot benefit from this double duty Bomb Strength improvement but never miss a chance to count this free blessing when placing your Bombing Missions on the map.

Night Missions are how you protect your Bombing Missions under the cover of darkness (and always without Escorts). Night Capable Bombers have a -1 DV penalty conducting a Night Mission (during clement weather), while night operations using “Day” Bombers’ suffer a -2 DV penalty for that Mission.
There are no Night Fighter units in Thunder in the East (or The Middle Sea, for that matter) and “Day” Fighters automatically Intercept on the -2 Dogfight column (modified only by the Bombers’ Tough and/or Vulnerable symbols) – so the cover of darkness is a great Bomber defense!
When you see a Bomb Strength backed by the Night symbol, consider employing them in useful fly-by-night Level Bombing operations!
Air Reserve is a special status. Whenever an Air unit enters the FLOWN box, its owner can place it in their Air Reserve. Operating thus protects it from all Airfields Attack damage (preventing them from enduring sticky Suppression markers) but at the cost of flying one Range shorter when used from the Air Reserve. That is, a Long Range Air unit in the Reserve can, at most, fly a Medium Range Mission; Short Range Air units are restricted to flying over their own Air Bases (City hexes) that are not within 6 hexes of an enemy Air Base.
We’re On a Mission
In this ETO Players Guide article series, we will separately cover Strategic Bombing, Fighter operations, Air Supply, and Airdrop Missions for paratroops. In this article, we wanted to shine some light on the less-referenced Air Missions, what they have to offer, and when you should find advantage in using them. For the game-within-the-game that is the air system in Frank Chadwick’s ETO, we wanted you to have this complete mission briefing.


New weather rules are being play test which will allow CAS missions to be flow more often. Red Bolts and Heavy symbols can be blanked with new weather types which will decrease odd shifts.